How to Apply for an India e-Student Visa in 2026
If you are planning to study in India in 2026, the e-Student Visa makes the process much easier because most of it is online. This guide will walk you through everything in plain English — what the e-Student Visa is, who can apply, the documents you need, step-by-step directions, how long it usually takes, common mistakes to avoid, and tips from students who have gone through it. Read it all the way and you should have no doubts left.
What is the e-Student Visa?
The e-Student Visa is a special online student visa for foreign students who have been accepted to regular, full-time courses at recognized Indian colleges, universities, or institutes. Instead of a paper-heavy process or many visits to the embassy, the e-Student Visa lets you apply using official online systems to make things faster and simpler. For the actual application you must use official portal — do not use unofficial websites.
Who can apply for the e-Student Visa?
You can apply if you have a confirmed admission or offer letter for a full-time degree, diploma, or other formal academic program in India. The visa is for students coming to study, do approved research, or join internships tied to a formal program. Make sure your institute is recognized and that you follow any extra steps required for your country. One modern requirement is that many students must register on the Serum Institute of India (SII) portal before applying. Registration gives you an SII-ID that you will need for the visa form.
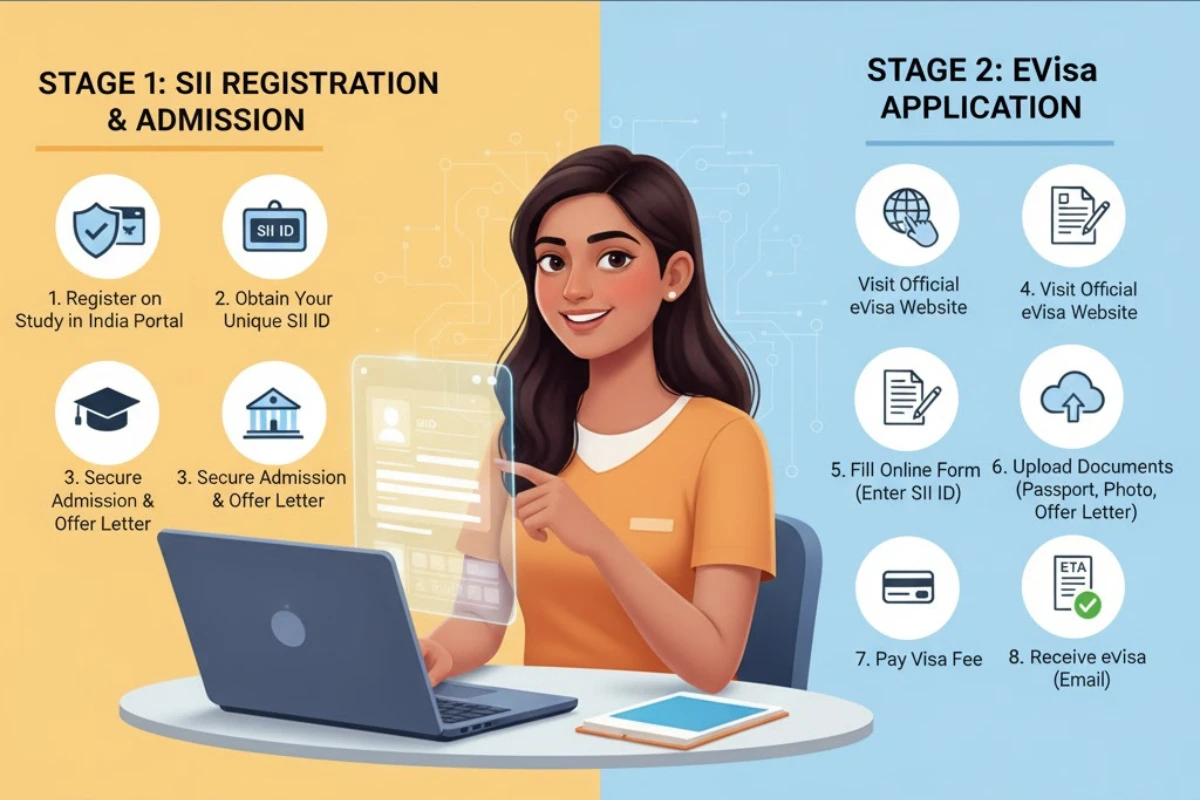
Step-by-step: How to apply for the e-Student Visa
- Accept your offer & get the admission letter
The most important thing is the official admission or offer letter from the Indian institute. Keep this safe — you will upload it with your application. - Register on Study in India (SII) if required
Many students must sign up on the Study in India portal and get an SII-ID. This ID links your student details to the Indian higher education system and speeds up visa processing. Save the SII-ID and emails you receive. - Go to the official India visa website (India Visa Online)
Use the India Visa Online portal to start your visa application. Choose the student/e-visa category (or follow instructions shown for the e-Student Visa). Always confirm you are on the official government site before entering personal details. - Fill in the online form carefully
Type your name exactly as on your passport. Enter the SII-ID or upload your admission letter when the form asks for it. Double-check every field — a small typo can slow the process. - Upload required documents
Typical items: passport copy (valid for required months), recent passport photos (correct size), admission letter, SII-ID confirmation, proof of funds or bank statements, and any other files the portal or your local mission asks for. Keep clear, high-quality scans. - Pay the fee online
Pay the visa fee on the portal and save the payment receipt or screenshot. - Track your application and wait
You can track your application through the portal. Processing times vary, so check emails and the portal messages regularly. - On arrival: FRRO / e-FRRO registration
When you land in India, follow onboarding instructions. Students often must register with the e-FRRO / FRRO within a few days or within the time the portal says (commonly within 14 days if your visa is for more than six months). This completes your local registration and gives you the residence permit details.
Documents checklist (simple)
- Valid passport (check minimum validity requirements)
- Two passport-size photos (follow specs)
- Official admission/offer letter from your Indian institute
- SII-ID or Study in India registration screenshot (if required)
- Proof of funds (bank statements)
- Any additional documents listed on the India Visa Online portal or your local mission.
Mentioning India Visa Requirements on the portal will help you confirm country-specific rules. Always check those requirements before you apply.
Validity, extensions, and rules
Student visas in India are usually issued for the duration of your course — in many cases up to five years for long programs. If your course goes longer or you need more time, you can apply for an extension inside India through FRRO. Do not work on a student visa unless your visa terms explicitly allow it. Check India Visa Requirements and FRRO guidance for exact details and timelines.
Common mistakes to avoid
- Using unofficial websites — always use India Visa Online.
- Uploading low-quality scans or wrong photo sizes.
- Forgetting SII registration if your institute requires it.
- Waiting until the last minute to apply — start early after you get your offer letter.
Tips from students (practical & human)
- Keep both digital and printed copies of every document.
- Save all emails and payment receipts.
- Join your institute’s international student groups — their tips on FRRO registration, local transport, and living costs are gold.
- If something confuses you, check India Visa Requirements on the official site or contact the Indian mission in your country.
Final words
Applying for the e-Student Visa in 2026 is mostly online and very manageable if you follow the steps: get your admission letter, register on Study in India if needed, use India Visa Online, upload clear documents, pay fees, and complete FRRO registration after arrival. Start early, keep copies, and ask for help when you need it. Good luck — and welcome to your studies in India!